I've been saying for quite some time that my mom and I were going to make a 8x8 album for my grandmother who doesn't live near us. We went and visited with her last July 4th and got some pictures of all the family together. They all came into town since we were coming. All of my family live up North, not to far away from each other....maybe a few hours. We live over 1000 miles away!!! So it was a special treat for us to be with all of the family at one time. Anyway, here is the first page of her album. It's titled: Woman of many names. Across the bottom of the page is sister, mother, (great) grandma. I started out with a beige piece of 8x8 cardstock and glimmer misted it with red and green. The circle and green piece of paper I inked them with Tim Holtz distress inks. The "woman" is the foam thickers.
 This LO gave me such a hard time. It has sat on my craft desk the entire month of June. Unfinished. This is another one of those LO's that I had to say to myself that I didn't care how it turned out just so I could finish it. This is Palette #9 from The Color Room. Does that tell you how long it sat there? LOL The pink scalloped paper I cut using my cricut. I glimmer misted the white cardstock. I used a doily (long rectangle) and cut it in half then glimmer misted it. The smaller flowers were white and I glimmered those and put a little pearl in the center after I colored them with alcohol ink.
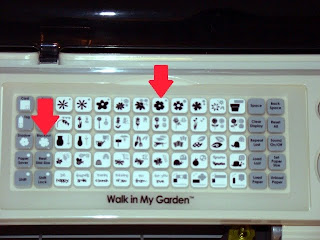
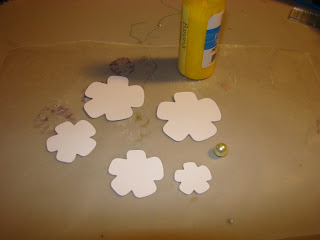
  I made these larger flowers myself. I will post a tutorial of them soon. I stickled them to give them more shine.
I found the little heart and key in the wedding section of hobby lobby. Thought it would add a nice touch here.
 I was going to add some journaling to this LO because I wanted to remember the story behind this picture but ran out of room. Probably write the journaling on the back. But while we were at the beach, Christian, my oldest was sitting behind Grace out of the camera view. I had my camera trained on Grace trying to get a good shot. Christian said or did something to make Grace whip her head around to look at him and when she did, gave this smile to him. Then just as fast, whipped her head back around and kept on playing. I'm so glad I had my camera ready and waiting b/c I indeed did get the perfect shot!!! I played with it in an editing program to give it the softer look.
 I hope the month of July finds me some more time to scrap!!!
Thanks for looking!!!!


 Spray both sides


