Pages

Thursday, July 29, 2010

More for Grandma's book!

Hello again!!! These 8x8 LO's are alot more time friendly than a 12x12!! I do plan to return to 12x12 but I have to get my grandmother's book done first!!! And here is the one I titled "Grands" I weaved a purple ribbon through the top part of the doiley. The title was so super fun to do. I painted the chipboard letters white. Then dabbed them in embossing ink, put UTEE on them and while the UTEE was still wet, I sprinkled Martha Stewart micropearls onto them. Then I put 2 more layers of UTEE on top to hold the micropearls. But you have to work fast so the UTEE will stick to the first wet layer. Butterfly came from wedding section of hobby lobby. The picture is of my grandmother with her grandchildren.
This is a picture of my dad, aunt and 2 uncles. The background (white) I sprayed with glimmer mist. The pink background was cut using my cricut. I used the MS butterfly punch. I also hot glued large diamonds on the rikrak ribbon. Diamonds came from the wedding section in Hobby Lobby.
This LO was inspired by Darien over at SB.com. Click her name to be taken to her blog. I used a script stamp and stamped the background. Then I used Gesso and painted over the script to dull down the brightness of it. I inked around each of the cream squares. I also used the same technique with the word "story" as I did on my "Grands" page, using the UTEE and the Martha Stewart Micropearls. I alcohol inked the beaded ribbon and the mat for the picture is a page out of an old book my mother had laying around her house.

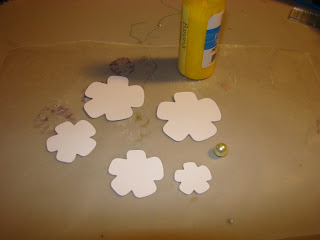
My silly cousins playing together (they are brother and sister) Not much to tell her except the green background was cut using the cricut. I glimmer misted the white background. I also handmade the flower in the lower left hand corner. The tutorial for that is in a earlier post.


And as always, thanks so much for taking the time to look and comment on my blog. It means the world to me!!!! Until next time,

Wednesday, July 21, 2010

More 8x8 LO's

So as I've mentioned in my last post, I've been making a scrapbook for my grandmother. She is 92 years old and we don't get to see her as often as I like. This page I used a white 8x8 cardstock that I sprayed with glimmer mist. I then cut out the pp using Gabby's ruffled paper technique. I also used the pleated fan technique in the corner. The butterfly is Martha Stewart Monarch butterfly punch. This is my husband and grandmother. I titled it "Built in Grandson"
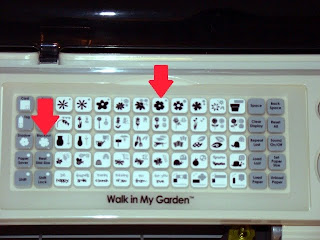
It's not very often that grandma has all her children together in the same place. So this picture is going to be very meaningful to her. I used the half shell punch by Martha Stewart and using a 2 3/4 inch paper I cute it all the way around to give it the illusion that it's a full circle. Then I weaved tulle in the middle and finished it with pearls that I hot glued on.
We went bowling while we were in NY visiting. First time I ever bowled with my grandma. It was awesome. My 3 year old and his great grandma bowling together was priceless. She is 92 and still bowls twice a week.

My dad and my 2 uncles. I used the Martha stewart butterfly punch and then glittered just the end of the wings. Letters are thickers. I handmade the flower. It's from a tutorial that I put on here not long ago.


This is my grandma with her sister (my great aunt) who's name is also Grace (same as my daughters) I handmade the flower. I'll have a tutorial for it soon. It's so easy and fun to make!! I painted the fence with Tim Holtz Fired Brick Distress Crackle paint.


Thanks for looking!!!!

Wednesday, June 30, 2010

Oh you make me Smile

It has been one crazy, rough month!! I still can't believe that we are about to enter July. Where did the time go? I've been super busy this month and haven't had alot of time to devote to scrapbooking. I know it's been way to long since I've last posted on my blog. I'm sorry for that. Maybe once the summer starts settling down I'll be able to scrap more. Okay on with it.

I've been saying for quite some time that my mom and I were going to make a 8x8 album for my grandmother who doesn't live near us. We went and visited with her last July 4th and got some pictures of all the family together. They all came into town since we were coming. All of my family live up North, not to far away from each other....maybe a few hours. We live over 1000 miles away!!! So it was a special treat for us to be with all of the family at one time. Anyway, here is the first page of her album. It's titled: Woman of many names. Across the bottom of the page is sister, mother, (great) grandma. I started out with a beige piece of 8x8 cardstock and glimmer misted it with red and green. The circle and green piece of paper I inked them with Tim Holtz distress inks. The "woman" is the foam thickers.
This LO gave me such a hard time. It has sat on my craft desk the entire month of June. Unfinished. This is another one of those LO's that I had to say to myself that I didn't care how it turned out just so I could finish it. This is Palette #9 from The Color Room. Does that tell you how long it sat there? LOL The pink scalloped paper I cut using my cricut. I glimmer misted the white cardstock. I used a doily (long rectangle) and cut it in half then glimmer misted it. The smaller flowers were white and I glimmered those and put a little pearl in the center after I colored them with alcohol ink.
I made these larger flowers myself. I will post a tutorial of them soon. I stickled them to give them more shine.


I found the little heart and key in the wedding section of hobby lobby. Thought it would add a nice touch here.

I was going to add some journaling to this LO because I wanted to remember the story behind this picture but ran out of room. Probably write the journaling on the back. But while we were at the beach, Christian, my oldest was sitting behind Grace out of the camera view. I had my camera trained on Grace trying to get a good shot. Christian said or did something to make Grace whip her head around to look at him and when she did, gave this smile to him. Then just as fast, whipped her head back around and kept on playing. I'm so glad I had my camera ready and waiting b/c I indeed did get the perfect shot!!! I played with it in an editing program to give it the softer look.
I hope the month of July finds me some more time to scrap!!!
Thanks for looking!!!!

Friday, June 4, 2010

Twiddleybitz giveaway!

Look at all this fabulous chipboard!!! You could have a chance to win this. Just go here for details.

Good luck!!!

Thursday, June 3, 2010

Flower Tutorial

Okay I've been seeing some flower tutorials using the Tim Holtz dies that you can use in your die cut machines. Well seeing how I don't have any of those machines except my cricut, I knew that I could make some flowers that were similar by cutting flowers out using my cricut. So I'm here to show you how to do that. First off, you need the Walk in My Garden cartridge. (You could probably use any cricut cartridge that has a similar flower but for this tutorial I used this one) Make sure you push the blackout button. You will need
2-2"
2-1 1/2"
1-1" of the "blossom" flowers. That is highlighted below. It's the 6th one over. You will also need a craft mat that is heat resistant. I have not purchased one yet so I used wax paper. Works just as good for the mess.


Get any color spray mist that you want your flower to be. Here I've used a yellow glimmer mist that I made myself.


Spray both sides


Crumble them up. You may want to use a glove at this point. I didn't but I don't mind getting messy when I craft.

After you open them back up take a pair of tweezers to hold your flower and using your heat gun make sure the flower is dried. Now, you will want to take the larger two flowers and stagger them as shown using hot glue to secure them. Do the same with the next two smaller ones. (I use hot glue b/c it's fast but you can use any glue that you want)


The smallest flower you will want to take your pearl (I got my bag of pearls at Walmart in the jewelery section) and hot glue it to the center. Crumble the petals up around the pearl.

Hot glue the small flower with pearl to the next size up and crumble those petals around the middle as shown.
Do the same with the largest size. This is what you should now have:
Carefully open the blossom back up and adjust the flower until you like the shape of it.
This is my finished product!! I made several in different colors as you see!!! You'll be seeing these on a LO soon.
I hope this tutorial was easy to understand and the pictures helped show what I was explaining. This is my first time doing a tutorial so any help/suggestions are appreciated! Sorry the picture quality is so bad. I had to do this indoors after the kids went to bed so my lighting was horrible. Thanks for looking!!!!!!

Wednesday, June 2, 2010

New Look

Time to change the look!! I got this awesome background and banner at http://blo64rt.blogspot.com/. Make sure you check out her blog!

Thanks!

Thursday, May 27, 2010

I got FEATURED!!!!

I know some of you are probably like, "what's the big deal?" Well I am super stoked!!! I've always wanted to be featured but never knew if there was a special way to get there. Well I signed on to scrapbook.com tonight and my "Adore" layout was on the front page!!!! How exciting!!! I hope there are many more featured layouts to come from me! This is so exciting. Can you tell I'm excited???? LOL I even took a picture of my computer screen with my LO showing. Dorky I know. HA! Anyway, thanks for listening to me yell and scream and putting up with me being giddy!!! YAY!!!! Oh and thanks to all who voted and commented on that LO on SB.com. I know you guys are the reason why it's there in the first place!!!!!

Saturday, May 22, 2010

Adore

I had so much fun with this LO and it came together so much better for me than my last LO. I used Prima flowers, butterfly and bling on this. I also handmade the roses, used my cricut for the title, inked all the edges with Tim Holtz distress ink in tattered rose. And I also used some diamonds! I'll show those in a minute! I used a sketch from Beggahuna. My papers are from My Mind's Eye. Here is my results:
Here are my diamonds! They are so neat. I found them in the wedding section at Hobby Lobby. There has to be probably 500 diamonds in this box for 7 bucks!! I used a hot glue gun to attach them. I also played around a little with one when I brought them home and you can use alcohol ink on them and it works beautifully!!!! (I've already made a pinkish/red one that I want to use on a LO).

I thought these were neat little butterflies. My mom bought a bag of them from Oriental Trading and she bought me a bag too! Love my mom! :) They are like a mesh type material. Almost like panty hose.

These are the flowers that I made. I tried something different though. I wanted them to be shiny all over and not just where I stickled. So when I punched the shapes out I coated them with Modge Podge gloss. Let dry and then continue making your rose. I put the link to the tutorial for these roses in an earlier post. It coats them beautifully. I still stickled one of the roses but decided not to on the other 3.

Thanks for looking!!!!!!
Misty


Wednesday, May 19, 2010

I hope you never lose your sense of wonder

So this layout gave me a swift kick in my rump. This thing has been sitting on my craft desk for about 2 weeks. I wanted it to be perfect. But when I finally said to myself that I didn't care if it were perfect I just wanted it done so I could move on, that's when I completed the project. Whew it feels good!!!

What I did to the picture is opened it in a editing program and made everything black and white except for what my son had on that day. Here is the result:


The words " I hope you never lose your sense of" I printed them out on cream color paper, inked the edges using Tea Dye distress ink and pop dotted just some of the words.
Oh I think this fence is ultra cool! This is the first time that I had played with the Tim Holtz distress crackle paint. I used the Picket Fence color. I put two coats on it so the cracks would be defined. After it dried and cracked, I LIGHTLY rubbed my finger over it using Tea Dye distress ink to emphasize the cracks in it. Then I again used my finger to go around the edges in Broken China distress ink. I made the roses on the fence and used a thin ribbon as my vine.

I did alot of first time techniques on this LO. The word "wonder" has to be my favorite technique applied to the entire LO. I used ghost letters by Heidi Swapp for the word and then played around with alcohol inks for the very first time. I am now in LOVE!!! I used the color Stream from the Nature Walk pack. I dabbed it to coat the entire letter with blue. Then I went back over it after it had dried and dabbed it again. I didn't know what it would turn out like but I'm so happy with the results. I don't know if you can see in the picture below but they came out looking like water droplets. Ultra cool!!!

Thanks for looking!!!
Misty

Monday, May 17, 2010

Here is the video from YouTube I promised, showing you how to make the lace flowers. They are SO easy to make!!!!!!
http//www.youtube.com/watch?v=1q9JdQRVuCw&playnext_from=TL&videos=gD8tBnXkhps

And here is Gabrielle's tutorial on making the roses that you see me use alot of on my pages.
http//www.mycreativescrapbook.invisionzone.com/index.php?showtopic=1743

Sorry it took so long to get these on here for you! We have had a very busy weekend. I'm currently working (err....actually stuck) on a LO of my son at the beach. I want to make it manly but want to use flowers too. Hopefully that will be done soon so you will have something new to look at!!!

Have a great scrappy week!!

Friday, May 7, 2010

You will never walk alone when you walk with God

Okay this is a picture of my daughter at Easter. I got the inspiration for the color palette from this amazing LO at scrapbook.com: http://www.scrapbook.com/gallery/source/300865/ella41.jpg
And the general overall layout design from this amazing LO: http://www.scrapbook.com/gallery/source/143639/20100422_1.jpg

Make sure you go and leave these amazing artists some love on their pages!
So here is my version. Not sure I'm 100% happy with it but for now it will do.
I tried some new stuff that I've never done before. One of them being the masking that I did with the butterflies. I really like the way that turned out.


Here is another one of the lace flowers I made using the tutorial I found on YouTube. I have got to find that tutorial for all of you. I really enjoy making the flowers and they always add a nice feminine touch to the layout without much expense.
Thanks for looking!!!

Thursday, May 6, 2010

Okay so bare with me as this is the first post on this blog in a long time. I've never had many followers so I've never seen the need to keep up with it. Plus this started as a family/scrap blog then later I took the family blog to another location. So anyway, I'm going to try to post more to this blog and lets see what we can get into!


One of my fav artist is Gabrielle P. over at http://www.scrapbook.com/. She is my inspiration and the reason why I've started changing up my scrapbooking some. I really like her style and was inspired to try my hand at it. I've done 2 other layouts using this same style but I haven't blogged them. This particular LO of my sister and I came from Gabrielle's original LO titled "MEG" You can see that here:
http://www.scrapbook.com/galleries/84905/view/2614791/-1/20/1.html
Isn't it amazing????
Okay so I realized that I had that exact same paper from My Mind's Eye (well it's actually my mom's paper but just here at the time) I loved the look she gave this LO so I once again decided to try my hand at it. I also did the ruffled paper technique she shares on scrapbook.com. I'll link it here when I can find it again. This is what I came up with. All the flowers on this LO are handmade.


Here is a close up of my branch and roses. I added "berries" to the branch with my pink 3D paint. I handmade the roses using another one of Gabrielles tutorials.


Another handmade flower that I did. I found this tutorial on YouTube and will link it here when I find it again. (I saved it in my favorites on YouTube)


Butterflies are punched using 2 different sizes of the Martha Stewart monarch butterfly punch. I just stickled them and glued them together.


Thanks for looking!!!

Monday, February 1, 2010

New Blog

Okay followers,
I've decided to make 2 seperate blogs. One for family things and the other for scrapbook stuff. You can guess this one will be for scrapbook stuff. Hence the title. If you are following more for my family entries this is my new blog: www.thebrunefamily.blogspot.com If you are here for more of my scrapbook entries GREAT! Just know you are more than welcome to follow my family blog as well. Hope to hear from you all soon!!!