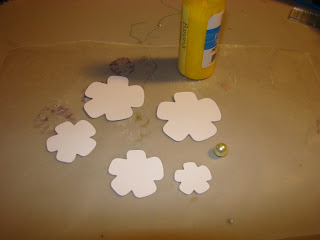
2-2"
2-1 1/2"
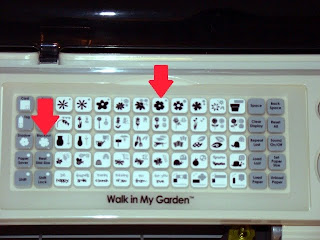
1-1" of the "blossom" flowers. That is highlighted below. It's the 6th one over. You will also need a craft mat that is heat resistant. I have not purchased one yet so I used wax paper. Works just as good for the mess.
Get any color spray mist that you want your flower to be. Here I've used a yellow glimmer mist that I made myself.
 Spray both sides
Crumble them up. You may want to use a glove at this point. I didn't but I don't mind getting messy when I craft.

After you open them back up take a pair of tweezers to hold your flower and using your heat gun make sure the flower is dried. Now, you will want to take the larger two flowers and stagger them as shown using hot glue to secure them. Do the same with the next two smaller ones. (I use hot glue b/c it's fast but you can use any glue that you want)

The smallest flower you will want to take your pearl (I got my bag of pearls at Walmart in the jewelery section) and hot glue it to the center. Crumble the petals up around the pearl.
 Hot glue the small flower with pearl to the next size up and crumble those petals around the middle as shown.
 Do the same with the largest size. This is what you should now have:
 Carefully open the blossom back up and adjust the flower until you like the shape of it.
 This is my finished product!! I made several in different colors as you see!!! You'll be seeing these on a LO soon.
 I hope this tutorial was easy to understand and the pictures helped show what I was explaining. This is my first time doing a tutorial so any help/suggestions are appreciated! Sorry the picture quality is so bad. I had to do this indoors after the kids went to bed so my lighting was horrible. Thanks for looking!!!!!!


They all Beautiful!!!! Thanks for the wonderful tutorial!!!!!
ReplyDelete